Class Discussions with WebEx
Participating in a WebEx Classroom Discussion
Your professor may decide to conduct class discussions though WebEx. This page can serve as a quick guide to participating in a discussion using WebEx.
A Downloadable version of this page (PDF)
WebEx Support Contact:
AU IT Help Desk: 706-721-4000
Before You Log into an Online Session
Set up Your Learning Environment
Secure a room for participation that has
- a door to control background noise and traffic flow to minimize distractions and encourages participants’ focus on the learning activities.
- comfortable chair(s)
- reliable LAN (hard-wired) Internet access
- fully functional speakers, especially if the conference phone system is integrated
with the room’s A/V equipment
Communicate with Others - Let others know you will be in a web conference (e-mail works well).
- Post a sign on the door to minimize interruptions and to let others know when the conference will end.
Know the Netiquette Ground Rules
- Keep your microphone muted when you are not speaking.
- Use the Chat, Raised Hand, and Emoticon tools to communicate with session panelists and hosts.
- If you will be using a telephone to join the conference audio, NEVER place the call on hold. (Ref. the Audio section for instructions to exit and re-join session audio.)
Joining a Session
- Navigate to the link provided at least 15 minutes before the official start time. Chrome and Firefox are the browsers that work best.
- Follow prompts to install WebEx plug-in(s) and to enter your name, e-mail address, and session password.
- Choose your preferred option to join the audio (phone line or Voice Over IP for “computer audio”).
- Follow the instructions to join the audio to help ensure it’s properly merged with your web profile in the meeting or session.
Important Terminology
- Sessions: web conferences held in the WebEx Training platform.
- Meetings: web conferences held in the WebEx Meetings platform.
- Events: web conferences held in the WebEx Event platform.
For more info,. refer to Cisco’s WebEx Center Comparison
Log Into Your Session/Meeting from a Computer
- Point your browser (preferably Chrome or FireFox) to the URL provided.
NOTE: If you have trouble with the direct log-in link, navigate to aug.webex.com, and enter the nine-digit session number into the Join field. Then, click the Join button to log in.
Classic View
Modern View
- If you’re prompted to install a plug-in, follow the instructions to do so.
3. Follow instructions listed in the Audio prompt to join the session audio.
Exit/Rejoin Audio from a Computer
If you need to exit and/or rejoin the audio any time, use the drop-down Audio menu
at the top of your WebEx application (Windows) or at the top of your screen (Mac).
You can also use the Audio button that’s just below participant feedback buttons.
Images used depict the Windows interface.
Note the built-in tool available for testing your speaker and microphone.

- Use the microphone button beside your name in the Participant Panel to mute/unmute
your microphone.
NOTE: If you’re unable to unmute your microphone, the Host/Presenter must enable this option for you do so. - Use the camera button to enable/disable your web cam.
NOTE: Participants will see the camera button only if the option is enabled.

NOTE: Presenters must enable the All attendees communication option to enable participants’ access to the All Participants recipient option in Chat. This recipient option allows participants to share “public” chat messages that everyone logged into a session can see.
- Display your Chat panel. (See Display/Hide Panels.)
2. Select the recipient from the Send to: drop-down list.
3. Type your message in the text field that’s just beneath the Send to: drop-down list, and type the ENTER key on your keyboard.
NOTE: Presenters can also right-click on a name from your Participant Panel to send
chat messages. Private chat messages are truly private; only the sender and receiver
can see private chat messages.
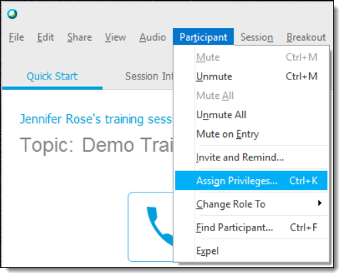
Presenter’s View of Assign Privileges Options

Participant’s View of Chat Panel

Display/Hide Panels
Use the View > Panels > Manage Panels option to display or hide your tool panels.


- Click the Pointer button, and then click the screen to display your pointer.
NOTE: The small arrow on the right side of Annotation buttons indicates more tools are available. - Click the Text button, and then click the screen to type. You must then click elsewhere on the screen to reveal your text to the rest of the group. (Only you can see it until you click somewhere else on the screen after typing.) Use the ENTER key on your keyboard to “wrap” your text.
- Click the Lines button to draw straight lines on the screen.
- Click the Shapes tool to draw squares, circles (use the Options button to see other shapes), etc.
- Click the Pencil button to draw freehand.
- Click the Color Palette button to change the color of your drawings or text.
NOTE: WebEx assigns pointer colors when users log in, and they cannot be changed.
8. Use the Eraser button to clear your pointer, delete drawings, text, etc.
Share Content
- Use the Share > File menu option to upload audio, video, and/or presentation files into your session/meeting. This method allows you and, if the option’s enabled, your attendees to annotate directly onto content for easier, more streamlined note-taking.
- Use the Share > Application option to minimize bandwidth consumption and to share
content selectively. This sharing method also helps prevent unintended content, like
instant messages, from becoming visible to your attendees.
NOTE: Avoid uploading files that are larger than 10Mb into a meeting/session, as larger file sizes invite technical issues. A work-around is to break large files into smaller ones and then label them something like “Part 1,” “Part 2,” etc.
Save Session Content
- Select the tab that contains content to be saved to bring it into focus.
- Use the File > Save (or Save As) menu option to save either a PDF or UCF (WebEx’s-‐‑ native file format) of content from the WebEx session window. Use the Chat option to save a copy of the session’s chat transcript in txt file format.
Appendix
More WebEx Support Resources
• Cisco’s self-service WebEx Help Center [https://help.webex.com/en-us/]
• Augusta University’s I.T. Tutorials and How-tos [https://www.augusta.edu/its/training.php]
• AU’s I.T. Help Desk: 706-721-4000